Creating Fog of War
In this blog post, I will talk about both the technical side and conceptual side of my processes when creating the Fog of War (FoW) mechanic. I have documented the journey with the aim of showing what game development is like on the technical artist side and contributing what I had learnt. I went through various approaches with lots of errors and iterations. My blog post will follow the rabbit hole I traversed through to have the FoW mechanic play an effective role for this game. Small warning but I will talk about some complex and nuanced technical art practices with assumptions of basic knowledge of technical art and programming.
Vertex Colour Method
I started with the most basic idea I could come up with. Using vertex colours. This technique uses each vertex of a plane mesh as a coordinate for a color. If the player is close, reduce the alpha of the vertex color. As a prototype, I manually drag what would be the game object that would be the player and see the results as fast as possible. The follow up would have been to replace the plane with actual 3D model assets with the script attached. However, this was terrible for scaling as this script loops through every vertex of the mesh at every frame on the CPU. This was also constraining for the 3D modellers of this project too. At this time, the concept of permanently changing a color of a mesh was very new to me. My naive assumption was that because GPUs have no memory of the previous frame I couldn’t run this logic using shaders. This is true, which is part of the reason why GPUs run so fast. GPUs can't afford to hold any memory because they hold the gargantuan responsibility of telling each pixel on the screen what color they should be at every frame. This is where textures come in. This is also where I had a realization how powerful textures are. 
Read and Write Texture Method
Textures are not just pretty pictures, but rather a source of data that can be read and written to. Enter my read and write texture method. At this point I still didn’t know exactly how I can use textures effectively on the GPU. I’ve only made shaders for materials and so writing shaders for textures was a bit mind-bending for me at this point. On the CPU it was much simpler. I give my script a black texture I save on file and use the player like a permanent marker to draw onto the texture. The logic was very similar to the vertex color method and instead of looping through each vertex, I loop through each pixel. This fixes the problem of depending on vertex positions, however the performance load has now just shifted onto the pixels themselves. Unfortunately, the larger the texture, the worse the performance. If I had a 4k texture, the CPU would have to do 16,777,216 loops every frame. The fundamental issue is CPUs run their code sequentially on a singular thread. This script goes through each texture element (texel) separately, runs a calculation and sets the pixel to a new colour every frame. This is about as unoptimized as you can get. Unless I put a tick rate so the texture updates every second or so instead of every frame, the game crashes instantly. This job is much more suited for GPUs. GPUs run their code in parallel meaning they can do multiple calculations at once and can batch render pixels. This is where I start to dive deeper into the rabbit hole of graphics programming.

Compute Shader method
The goal was to find a way to write to a texture on the GPU and compute shaders do exactly that. At this point in time, compute shaders are quite manual to set up in Unity. Essentially there are three files that work together to output a texture, or more specifically what is known as a render texture, which is built to be generated and updated at runtime. First is the compute shader file where I write all the instructions of the FoW map, in HLSL format. I’ll dissect the HLSL code later on. A key detail is the “numthreads”, “SV_DispatchThreadID” and “kernel” which are required for compute shaders. The “numthreads” which refer to the thread group is a vector that tells the GPU how many pixels to batch render and what size that array should be at each GPU frame. Most GPUs have a cap of 64 threads and I’m creating a 2D render texture so the appropriate thread group is [8, 8, 1]. 8 multiplied by 8 multiplied by 1 is 64, creating an 8 by 8 2D array. This may sound trivial, but it is very important to understand what the thread group should be. The SV_DispatchThreadID is just a semantic that gives each thread a unique ID for the GPU. I don't want to go into too much depth into that because that leads to the shader compilation rabbit hole. The kernel is also quite important, but a bit easier to understand. It essentially is a point of entry to the compute shader that other scripts can refer to. The next file is a CPU script that is responsible for dispatching what the compute shader outputs. I write a C# script that generates a new render texture, sets the render texture based on the output of the compute shader and then dispatches that render texture so other shaders can sample it. It also handles setting variables of the compute shader at runtime. This is a very similar process to updating variables on regular shaders at runtime. The last files all the material shaders. All the material shaders have to do is sample the render texture just like any other normal texture. This can be done in HLSL code or shadergraph. I do a bit of both in this project.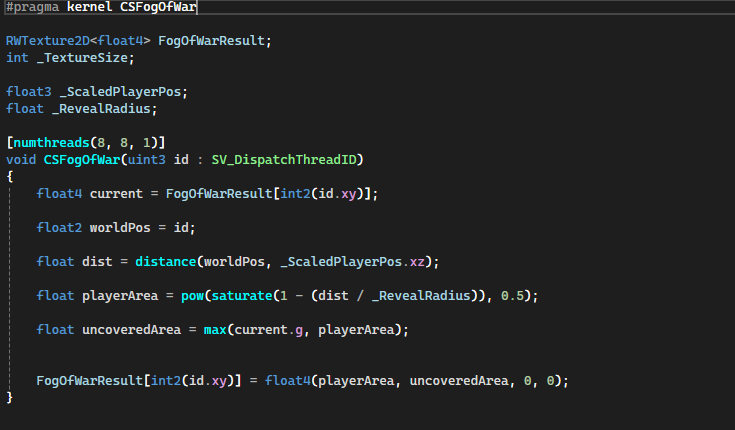
Back to the compute shader, we are now set up to write some good old fashioned HLSL with my FogOfWarResult as my final output of the render texture. At this point it is not a render texture yet, but rather just an output. My CPU script tracks my players world position so the compute shader can compare the distance from the player to each texel. Something that is worth noting is this is the exact calculation I did in my previous iterations. At the core, the concept never changes, just the method. Now I still run into the issue of the frame-by-frame memory of the GPU, however this has been solved. GPU code is statically typed, meaning it is compiled line by line and guarantees the line above will be executed before the next line begins. This means I can sample the previous render texture result before I calculate the next output. This technique is called “Temporal Accumulation”. The question is what do I do with the sampled data. Well as complicated as it all seems, the solution is simple. Using the “max” function, I compare which result is a higher value at each texel. When the player leaves the previous spot the sampled texel value is chosen, resulting in a black and white mask that is permanently altered at runtime.
First Implementations
Now I have the stored data, it is time to be creative. The first thing tech artists should learn is a black and white mask can be used as data, like a value. Alpha, speed, vertex positions, pretty much anything can be influenced by a mask. My game is about earning vision and the aesthetics are dark, moody and retro themed. I decided to select warm colours where the player is, dark cold colours where the player had previously been and black where the environment had not been discovered yet. I plan on using a post processing dither shader so I have to be careful with small details as that can lead to a noisy output. Another small addition is using controlling the alpha on the fire shader based on the render texture output. As the player comes closer, the fire appears to light up. From playtesting, this was an appreciated feature that was easy to implement now that the compute shader is functional.
Minimap
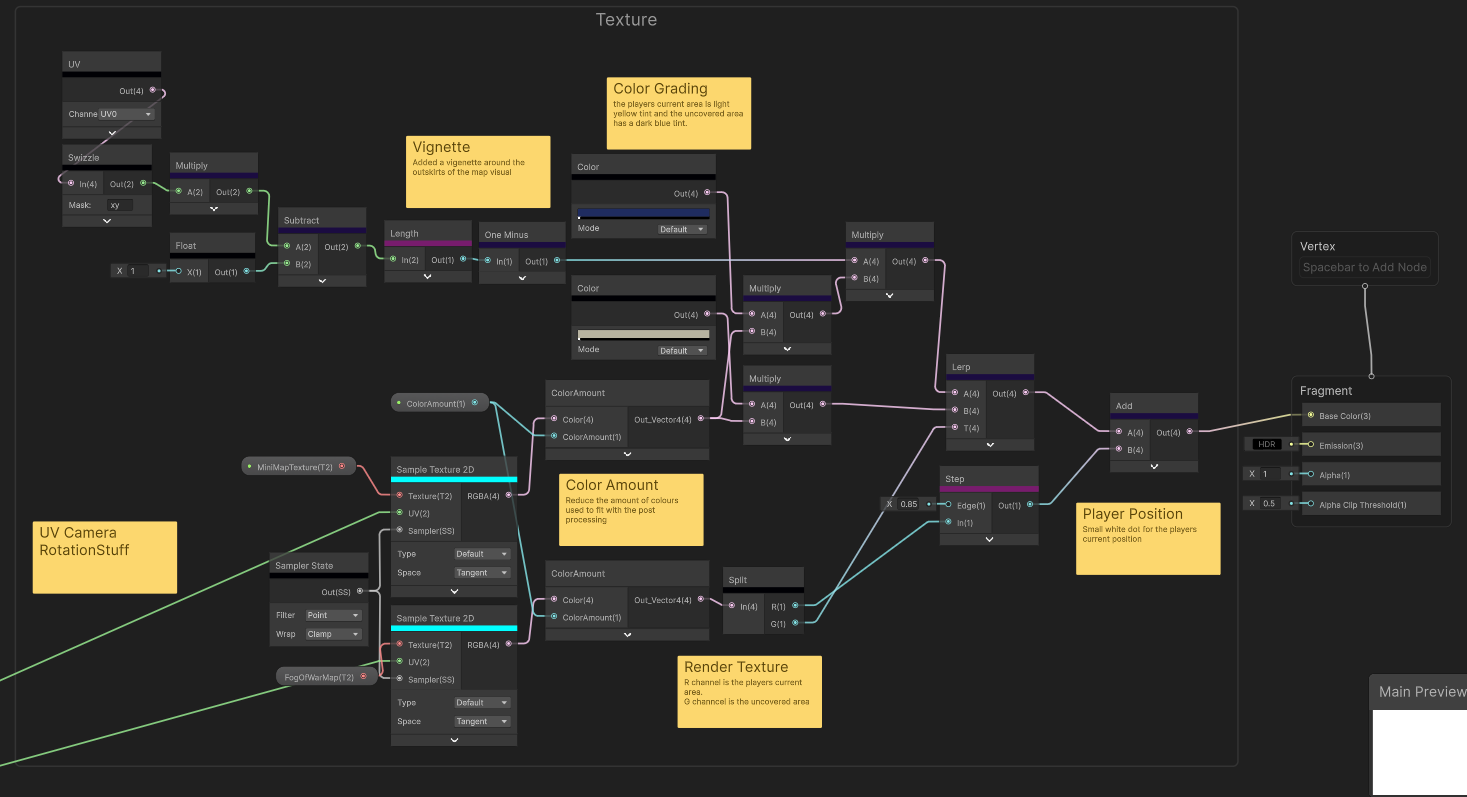
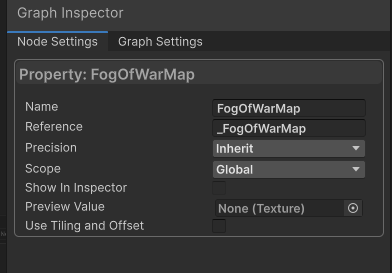
While playtesting the game, players were getting lost around the map. Usually the solution is better level design, not a minimap. We decided to do both considering the minimap would be easy to implement because the FoW shader is already a functional map. What you will find in most YouTube tutorials is the usage of a separate camera for the minimap. This is very unoptimized and usually not worth the cost in performance. This game doesn’t do that. Instead I recycle the render texture that already exists and use a screenshot of a birds eye view of the level. I also have coordinate information of the player as well which I will represent as a white dot. For the minimap, I use Unity’s shadergraph. I tried to be thorough with my notes. Most of my nodes are just for color adjustments. The main thing to look at is the lerp node where I sample the black and white mask in the GIF above and lerp between two colours that are multiplied by the minimap texture. The UVs for the sampled texture handle the scale and rotations. I won’t go too further into that because that probably requires a blog post on it’s own. Another key technical detail is the “FogOfWarMap” texture scope needs to be global because this texture is used in many other places. This can be set in the node settings of that variable. If we can remember, the CPU script that handles the compute shader sets the render texture too. This is where the minimap shader gets this texture from so theres no need to manually put it in yourself.
Post Processing
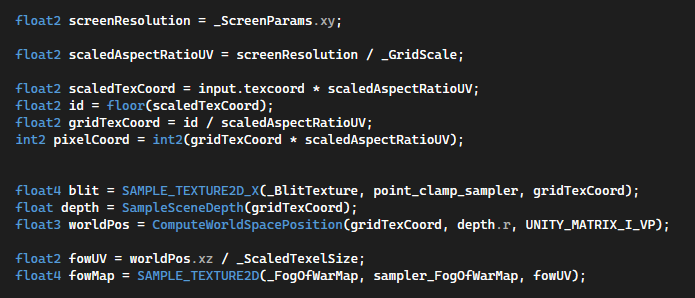
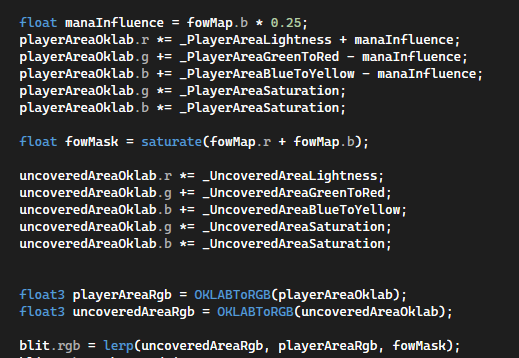
The final implementation is sampling this render texture in the post processing pass. This was a decision made later in the project to harmonise the colour palette of the game. I found rendering the yellow and blue color palette directly onto the materials was limiting and hard to control considering the lighting model had so much influence on the end result of the assets. Again, post processing would be it’s own blog post, but I will discuss the fog of war part. This time it is in shaderlab code. Sampling the render texture is a bit different considering post processing is in screen space. Unity provides the transform function that turns screen space to world space using the scene depth buffer. This can be used as the UV to sample the render texture. The question again is what do I do with the mask. During this project I discovered a color space called OKLAB color space. This is a replacement for HSV (Hue, Saturation, Value) and better attempts to solve the issue of maintaining the same brightness level across hue values. I’ll link the reference below as it is explained better there. From a designer’s perspective, it’s theoretically easier to pick and control harmonised colour palettes. What I thought would be cool is to have two different colour palettes between the current player area and uncovered area. For our team, this opened up new possibilities of what the game could look like without much redesign. Compared to the material iteration, myself and my team felt a lot happier with the final colours of the game.
Over the 14 weeks I had tinkering away at this part of the game, I felt like I came a long way. From using vertex colours to read and write textures to compute shaders and discovering the uses of textures has propelled me into new possibilities. I still feel like I’ve only scratched the surface of what could be done with this tech. I wanted to use the blog post to share what I found to be extremely valuable information. I have had prior experience as a technical artist in other projects so I wouldn’t recommend these techniques for beginners. I find these sorts of published blog posts to be rare. A lot of the techniques I used were from various forums and some brief knowledge. The big hurdle was understanding the process of reading and writing to render textures. Once it gets into a regular shader, I was back in my comfort zone. I can’t wait to find other ways to use the newly discovered tech.
Thank you guys for sticking around, reading about me nerding out about technical art practices. I hope this was helpful.
Get Helm of Heresy
Helm of Heresy
Escape the desolate dungeon depths and combat formidable wardens.
| Status | In development |
| Authors | Jeremy, Genesis, ZephyrVII, 20lux, jazari |
| Genre | Adventure |
| Tags | Dark Fantasy, Dungeon Crawler, fog-of-war, Horror, Isometric, Medieval, Pixel Art, Singleplayer, Third Person, Thriller |
More posts
- Patched Unity Security Vulnerability from Oct 3rd51 days ago
- The PitchAug 06, 2025




Comments
Log in with itch.io to leave a comment.
Cool reading about this develop from an optimization bottle-neck to a core game mechanic.
Really cool seeing how this mechanic evolved and improved over time. Great job and this was a nice read!